How to Start Primary Care Vaccination Clinic in Ontario? | A Workflow
4 years ago
With vaccine supply increasing, the Ontario government is bringing more and more healthcare entities into vaccination programs.
After pharmacies, primary care settings can also now administer the COVID-19 vaccine.
And this is considered as the welcoming decision as Canadians trust their family physicians or primary care providers more.
However, unlike pharmacies that are offering vaccines by pre-booked appointment only, the primary care settings are required to contact the eligible Canadians directly to book an appointment.
So, to help primary care providers who are interested in starting a vaccination clinic or center in Ontario, we are sharing the entire workflow here.
The workflow of the COVID-19 vaccine at primary care clinics is shared by AFHTO (Association of Family Health Teams of Ontario).
Starting primary care vaccination clinic or center in Ontario
The entire process has been divided into 2 steps.
The first step is all about preparing your clinic for COVID-19 vaccination and the second step is all about vaccination taking place or vaccination event.
So, let’s start with step 1.
Step #1: Preparing your clinic for COVID-19 vaccination
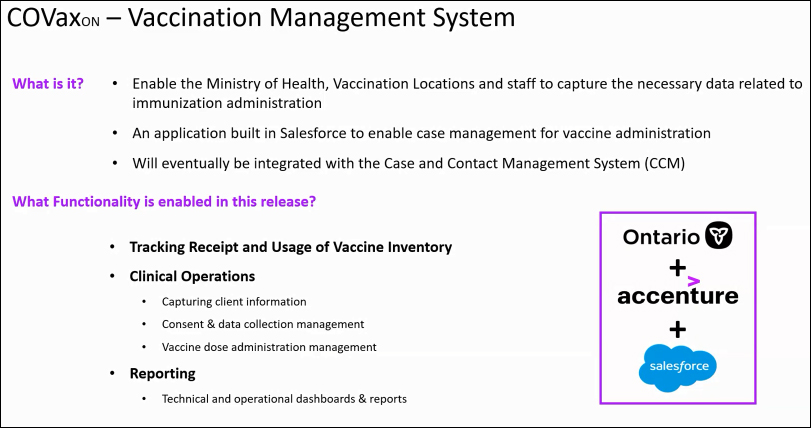
1. COVax ON access and training
COVax ON is the vaccine management system that enables the Ministry of Health (MOH), Vaccination Location, and staff to record all data related to vaccines.
- You need to prepare the user roles for your vaccination clinic and submit the user list to MOH for COVax ON access. Users include site staff, vaccine administrator, inventory administrator and site superuser.
- Complete the two-factor authentication and log into your COVax ON.
- Attend COVax ON training session organized by OntarioMD. (Check it out from here)
- Assign a site superuser from your COVax ON dashboard. The COVax ON system is a role-based system. Meaning, not every user has access to all features - except for a site superuser.
#AdditionalWorkflow
A primary care setting receives vaccines from an Authorized Organization (AO) which is in most cases a public health unit.
AO also creates Vaccination Events (VE).
What you have to do is, create a list of clients (people whom you will give the vaccine) and bulk upload the list to the COVax ON system.

2. Creating patient lists
- You need to find the eligible only patients or Canadians from the EMR you are using.
- You can find patients in hotspot communities by postcodes.
- Or, you can also find eligible patients based on certain health conditions that fall under the Highest Risk, High Risk, and At-Risk categories.

- You should now cross-check if there is anyone on the patient list who has already been vaccinated. You can easily do this by comparing your patient list with the vaccination report pulled from COVax ON.
3. Contacting the patients
- Your team members can call the patients for booking vaccine appointments.
- Every booked appointment either through phone or via an online vaccine appointment booking system should be reflected in the EMR.
You should read this: How to develop your own vaccine booking portal?
4. Uploading patients data to COVax ON
- You should upload the data of patients who have booked the vaccine appointment.
- The ideal practice here is to mass upload the data of patients fewer than 100.
- If you want to upload data of more than 100 patients, you have to contact the public health unit.
- You should also create a standby list of patients in case of any appointment cancellations/no-shows.
Step #2: Giving vaccine on the day of a vaccination event
1. Obtaining consent
- You should share the consent form attached with the appointment booking link with patients.
- After giving the vaccine, the primary care provider should take verbal consent.
- You can also laminate the consent form and post it at the check-in area.
- You can also email a consent form to patients and ask them to fill and bring it at the time of vaccination.
#BonusLearning
Your team is going to have 10-14 team members with different roles and materials.

2. On-site check-in
- Upon the arrival of patients, you should check the appointment detail and consent form.
- After check-in, the sticky note system is used.
- If the consent form is invalid, a red sticky note is used to indicate the primary care provider.
- Along with the consent form, you should also share the screening form. If the screening form indicates that a patient has a pre-existing condition, a yellow sticky note is used to indicate the primary care provider.
- And if there is no issue with the consent form and screening form, a green sticky note is used.
3. Administering the vaccines
- The patient reaches to the primary care provider to receive the vaccine where verbal consent is obtained.
- After the patient has been vaccinated, the primary care provider documents it within EMR and COVax ON.
4. Patient monitoring and check out
- Patients wait for 15 minutes in the waiting room.
- EMS team members monitor the patients.
- After 15 minutes, you should email the vaccination receipt to the patients.
We hope this blog will help you.
If you still have doubts, feel free to contact us.
As Canadian healthcare IT experts, we will guide you through every technical and compliance challenge you face - without considering our gain.
Because be it automation or development, we always feel grateful to use our expertise in our country’s greatest vaccination movement!